FishUSA.com Fishing Tackle

Author Topic: Post a picture of your camp.  (Read 51534 times)

Mac Attack

  • Sr. Member
  • ***
  • Posts: 10,210
Re: Post a picture of your camp.
« Reply #165 on: Jul 22, 2023, 07:51 PM »
Our new TT.
Only 22' but enough room for us and the pooch.


wallyworld

  • Sr. Member
  • ***
  • Posts: 1,678
Re: Post a picture of your camp.
« Reply #166 on: Jul 22, 2023, 08:08 PM »
Nice little home away from home  :thumbup_smilie:

Mac Attack

  • Sr. Member
  • ***
  • Posts: 10,210
Re: Post a picture of your camp.
« Reply #167 on: Aug 04, 2023, 06:12 PM »
The solar controller took a dump.
It's under warranty and will be replaced.
But because I'm going to pull the 165W solar panel off the roof and replace it with four (4) 200W panels, I'm going to need a much larger controller anyway.
So last night I ordered a Renogy Rover 60A unit and also the optional BT-1 bluetooth module for it.
I will be installing the 2000W inverter later when the weather cools down a bit.
We are taking a short trip up to Knoxville the end of the month and I want to use the solar to keep the fridge running while on the road, and also charge the battery back up after the fridge running all night on it during rest stop nights.
The generator/inverter showed 2 days ago.
Yesterday Donna and I tested it, and it runs the entire trailer, microwave and AC included.
This winter, I change it over to LiFePo4 batteries from the existing LA garbage deep cycle junk.
If anyone is nearby and want the old one you can have it.  PM me.

Mac Attack

  • Sr. Member
  • ***
  • Posts: 10,210
Re: Post a picture of your camp.
« Reply #168 on: Aug 30, 2023, 07:30 AM »
Our campsite in Lenoir City, TN


ActiveTrapChecker

  • Sr. Member
  • ***
  • Posts: 914
Re: Post a picture of your camp.
« Reply #169 on: Aug 30, 2023, 07:51 AM »
Nice Mac. Enjoy!

ActiveTrapChecker

  • Sr. Member
  • ***
  • Posts: 914
Re: Post a picture of your camp.
« Reply #170 on: Aug 30, 2023, 06:55 PM »
Hey Mac. Was this a planned trip or was it hurricane related? I saw your other post, glad you’re home weathered the storm

Mac Attack

  • Sr. Member
  • ***
  • Posts: 10,210
Re: Post a picture of your camp.
« Reply #171 on: Aug 30, 2023, 07:02 PM »
Hey Mac. Was this a planned trip or was it hurricane related? I saw your other post, glad you’re home weathered the storm

It was planned a month or more back.  Maiden trip with our new camper.
Ironically, it ended up coinciding with Idalia. 

Our place is WAY south of that hurricane.
We are in North Port, halfway between Sarasota and Ft Meyers.  About 2 hrs south of Tampa.
We got ours last year with Ian and we are still rebuilding.

Thanks for the thoughts!

Raquettedacker

  • MFF Mod Team
  • Sr. Member
  • ****
  • Posts: 11,666
Re: Post a picture of your camp.
« Reply #172 on: Sep 04, 2023, 02:05 PM »
This one was this weekend..


Sometimes we live no particular way but our own.....<br />Strangers stopping strangers just to shake there hand...<br />\"Dying is the easy part. Learning how to live is the hard part....\"

Mac Attack

  • Sr. Member
  • ***
  • Posts: 10,210
Re: Post a picture of your camp.
« Reply #173 on: Sep 04, 2023, 02:56 PM »

Mac Attack

  • Sr. Member
  • ***
  • Posts: 10,210
Re: Post a picture of your camp.
« Reply #174 on: Sep 21, 2023, 01:55 PM »
I added a generator stand on the front to permanently mount my generator onto.
It works really well.
The cover on the generator allows for the sides to roll up and be tied, so I can run the generator, even in the rain.
The generator runs everything when needed for about 12+ hours on the 4 gallon tank.
This is full time AC, TV, CPAP machines, microwave, etc.
It's rated for 300 lbs and the generator is under 100 lbs with a full tank of fuel.


Raquettedacker

  • MFF Mod Team
  • Sr. Member
  • ****
  • Posts: 11,666
Re: Post a picture of your camp.
« Reply #175 on: Sep 21, 2023, 04:56 PM »
Nice Mac..
Sometimes we live no particular way but our own.....<br />Strangers stopping strangers just to shake there hand...<br />\"Dying is the easy part. Learning how to live is the hard part....\"

Mac Attack

  • Sr. Member
  • ***
  • Posts: 10,210
Re: Post a picture of your camp.
« Reply #176 on: Apr 14, 2024, 10:17 AM »
I promised to provide an update on things as I moved along.
Yesterday I finished the electrical upgrades.

The Furrion 25A solar controller took a dump the very first day.
The trailer manufacturer immediately replaced it for me, but I didn't install it.
Instead, I installed a Renogy 60A solar controller.
I planned on adding three 200W solar panels to the existing 165W panel that came with the camper, so I needed a unit that could handle more current.
I bought the bluetooth module option for the controller too.
It allows me to monitor the controller from my smartphone.
I also added a small breaker in the PV line for maintenance purposes.

Here is a photo of the bad Furrion solar controller -


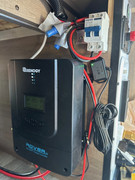
Here is a photo of the new Renogy solar controller and breaker -


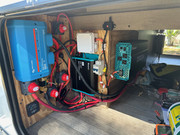
Here is a list of the electrical upgrades I made -

2 - 12VDC, 280ah, LiFePO4 batteries (gives me a total of 560ah)
1 - Renogy 2000W inverter to convert 12VDC to 120VAC - this will run everything AC in the camper, even the AC, but I probably won't ever run the AC on the inverter as it would only allow for about 3-4 hrs of runtime before the batteries become too low.
1 - Renogy 40A DC-DC charger - this allows my truck's alternator to charge things as I travel down the road, along with the solar panels.  The 7 pin trailer connector only allows for 7-9A of charging capacity.  I wanted more than that.
1 - Victron BlueTooth shunt to monitor everything going into and out of the batteries.  The BT allows me to see it on my smartphone.
1 - Victron fused buss bar
4 - Disconnect switches, one 300A main for the batteries, and three 250A for the other DC feeds from the buss.

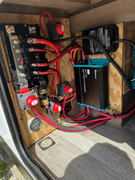
The inverter installation and troubleshooting proved the most troublesome.
The original installation called for an auto switch to run power accordingly when using the inverter and around it when not.
I bench tested things before the installation and found the auto switch not reliable.
I installed it anyway, and then regretted it.
Didn't work at all installed into the camper electrical circuit.
So, I designed a new system with a manual breaker.
Same breaker type I used on the solar controller PV.
Lots of rework, but it worked fine in the end.

Here are some photos showing the installation.  The second photo shows that auto switch on the inverter. -


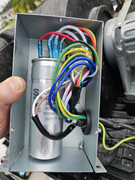
Then came the soft start for the AC unit - basically a large capacitor that allows for the AC unit to start without a huge current surge.
It allows for me to run the AC unit on only a 2000W inverter vs the standard 3000W unit.
I have developed a very severe fear of heights over the years.
So much so, that it makes it very dangerous for me to get off, or back onto, a ladder.
This really made doing my job over the years interesting.
Lots of roof work, and catwalks in plants.  hated it!

So, my son Christopher helped by going up top last Fall and installing the soft start.
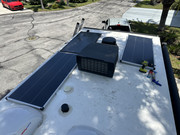
Here are some photos he took.  Notice the last photo that shows the original 165W solar panel that came with the camper -


Next, we did the solar panels.
Again, I had to wait for Chris to help.
We started this 2 weeks ago when he and my grandson arrived at Easter.
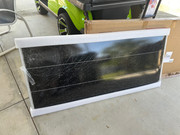
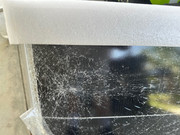
However, one of the three panels was smashed when I opened the crate.
I kicked myself in the butt for not opening the crates sooner and inspecting them.
Anyway, we sent it back (Amazon rocks!!!) and the new panel showed yesterday in time for Chris to get it up there and help me with the wiring interconnect.
He was up on the roof and I worked from both my extension ladder and my 8' step ladder along the sides of the camper.
Lots of work getting these installed, sealing the roof, and getting all the interconnect wiring run.

Here are the photos of that work and the broken (smashed) panel that was returned -


Here are some screen of what I see on my iphone from the BT.

The solar controller BT -


The shunt BT -


Tons of electrical work done.
This, along with the generator, will allow us to camp anywhere off grid (boondocking) without having to plug into shore power.
Rest stops, Walmarts, Bass Pro, Cracker Barrels, Harvest Hosts, pretty much anywhere instead of paying for a campsite in a campground.


Next large project is replacing the leaf springs and axles.
I will also change out the center support for the leaf springs to a unit with rubber cushions and wet bolts with grease zerk fitting and bronze bushings insted of the poly bushings that come from the factory.
The current axles and are rated for 3000# each (6000# for the camper).
The springs are each rated at only 1500# (6000# for the camper total)
The new axles will be rated for 5200# each (10,400# total).
The new wheel hubs on the axles will be rated for 4400# each (17,600# total).
The new leaf springs will be rated for 4400# each (17,600# total).
We are planning a trip to Alaska with the camper in 2026 and the roads aren't the best, to say the least.
Many people do this trip and find out their axles and springs aren't up to the task.
This results in bent axles and broken springs while on the road and it typically happens out in the sticks where you can't get service.
Serious breakdowns like this cost big bucks in towing and parts shipping.
So, I'm doing the work up front to avoid the headaches and huge costs.
The new axle assy, including the hubs, brakes, and leaf springs, fully assembled ready for installation is less than $1200.
I was going to do this install myself, but I found a local shop nearby that will do the installation for only $300.
So why not let them do it.
They also do metal fabrication and welding.
I will have them reinforce the leaf spring shackle mounts, so they don't bend either.
I'm also going to see if they want to reinforce the rear bumper on the camper and build me a large storage box to mount on it along with two spare tires.

Onward!

Mac Attack

  • Sr. Member
  • ***
  • Posts: 10,210
Re: Post a picture of your camp.
« Reply #177 on: Apr 21, 2024, 08:06 AM »
Summary of the camper electrical upgrades we made.  Prior to today I have tested the solar panels and the new Renogy solar controller and they work very well.  Also tested the 2000W inverter and that works awesome.  The lithium batteries have tons of power and show they are actually capable of putting out more ah than they are rated for.
Today I spent time discharging the lithium batteries down to about 8-9% SOC.  I then killed pretty much all of the current draw on them and plugged the AC into my house using a 15A to 30A pigtail.  The stock WFCO 55A converter that came with the camper came on and started charging the batteries as it is supposed to do.  However, it is only putting out about 12-15A and it is rated for 55A.  I have heard tons of stories about these units and probably should have upgraded it but saved that cash for now.  It is still charging.  But at that rate, it will take about 40 hrs to fully charge the batteries.  Normally, this isn't a problem because I have 765W of solar panels up on the roof now adding to the charging.  So, for now, I will live with things the way they are.  But I have my eye on another 60A converter that runs about $350 or so.  Maybe.  We will see.
I then tested the 40A DC-DC charger that I ran the cable on the truck yesterday for.  I was really nervous.  But it worked fine.  Puts out almost the full 40A.  BTW, I also tested the 7-pin plug.  It puts out between 6-7A.  Most people are under the impression that the 7-pin puts out far more amps.  I did a lot of research on them and found different.  They are pretty much all fused at only 15A, so they obviously can't put out more than that.  But people don't typically know this.  A 7A charge source doesn't really accomplish much.  Just as my 55A rated converter only putting out 12-15A doesn't do much.  However, it all adds to the charge string when tooling down the highway.
I will let the converter finish its job and charge the batteries fully, and then deplete them down to less than 10% to perform another full recharge cycle.  Then pack things up and put the camper back into our storage compound until our trip north in June.  BTW, the fridge is running too.  I turned it on just to make sure that it works as it's supposed to.  The fridge is a 12VDC Furrion and it draws about 15A.  So, the 55A converter, showing on the shunt that only 12-15A is going into the battery, is actually creating 27-30A out of the rated 55A.  Soooooooooo..................closer than I thought.  However still not putting out the rated 55A.
Next project are the leaf springs and the axles.  But I have a contractor coming soon to start on my shed expansion.  So, I am thinking of holding off on this until we get back down here in September sometime.
Overall, I had tons of fun doing this project.  It will certainly be helpful down the road when boondocking and will obviously more than pay for itself on our trip to Alaska in the camper in 2026.


Update -

Correction. The converter is only putting out 8.4-8.5A. I turned off the fridge and last few 12VDC lights and that is all that is going back into the battery. I double and triple checked and my earlier figures were incorrect. I suspect the OEM ran cable that is far too light gage for the current and length of run. Doesn't surprise me. I will leave things the way they are and probably add a lithium battery charger in the basement near the battery buss system with adequate wire to handle the load. The existing converter can handle all DC power needed when on shore power along with minor battery charging. The solar can supplement and the charger I will add can be used here and there as needed, if needed. We will see. Still happy with the results.


Another update -

Got up this morning about 7:30 and immediately checked it.
SOC is up to only 29% with only 6.6-6.7A going into the battery.
The current draw changes throughout the SOC on all batteries.
Additionally, the BMS has a lot to say about how much amperage can go into and out of the battery.
However, 6.6-6.7A is was lower than the BMS will allow, so it isn't the BMS.
My major limiting factor is the very long wire run from the converter to the battery.
The fix is to run heavier 4 gage cable directly from the converter to the battery.
Not an easy task as the converter is in the extreme rear end of the camper and the batteries are at the other end in the front.
Would require dropping the underbelly the entire length of the trailer.
I might do this down the road.
We'll see.
Everything I did works great.
So, I'm pretty happy.

wallyworld

  • Sr. Member
  • ***
  • Posts: 1,678
Re: Post a picture of your camp.
« Reply #178 on: Apr 21, 2024, 02:36 PM »
I didn't understand a word of all that (except the fear of heights part) but glad it worked out the way you planned for now   :thumbup_smilie:

KingPerch

  • Sr. Member
  • ***
  • Posts: 7,463
Re: Post a picture of your camp.
« Reply #179 on: Apr 21, 2024, 03:05 PM »
Mac, you’re missing a flux capacitor!!!😁
“I’ve never met a Perch I didn’t like!! 😎

Time spent fishing is not deducted from one’s life span


Iceshanty | MyFishFinder | MyHuntingForum
Contact | Disclaimer | Sponsor
© 2004- MyFishFinder.com
All Rights Reserved.